
What is a Title Block?
In context of a Construction Drawing, a Title Block is the viewable area of a Drawing Sheet that provides a consistent method of displaying information about that Drawing. A Title Block that is in a consistent location and has a consistent arrangement of information for all Drawings in a set, aids in:
- organizing and referencing drawings,
- streamlining the construction process, and
- facilitating effective communication among project stakeholders.
Title Blocks are most commonly located in the lower right-hand corner of the drawing sheet, but they may exist anywhere on the sheet, and in some instances are distributed across different areas of the sheet. Also, the information within the Title Block may be presented horizontally (the most common), vertically, or as a mix of both.
The normal expectation is that every Drawing within a ‘set’ has the same exact Title Block location and arrangement. Many project organizations will take this a step further and will mandate that the same Title Block location and arrangement be used for all Drawings Sets on a project, irrespective of the contributing organization.
NOTE: Because each contributing organization (architect, designer, consultant, etc.) may be using different authoring tools and have their own internal ‘standards’, the reality is that even the best attempt to standardize Title Blocks may yield subtle differences across Drawings sets. Multiple Title Block Templates may be necessary to reliably intake drawings sets from multiple sources.
Image 1: Example of a Title Block in context of a Construction Drawing

What type of information is displayed in a Title Block?
A Title Block normally includes at least the Drawing Number and the Drawing Title. But it’s not uncommon for Title Blocks to include additional information, such as Discipline, Revision Number, Revision Date, Building/Area, Issue Purpose, and possibly even project-specific attributes. Each informational element may or may not have an associated label.
It’s also not uncommon for some information in the Title Block may be embedded within another attribute. For example, while ‘Discipline’ may sometimes be depicted as its own attribute (e.g., “Structural”), it’s more common (especially in North America) that the Discipline is instead represented by 1-2 characters of the Sheet Number (e.g. “S100”, where the ‘S’ represents “Structural”). Other examples of ‘embedded attributes’ include appending the Drawing’s ‘Revision Number’ to the end of a Sheet Number, or prefixing the Drawing Title with an ‘Area’ designation.
Image 2: Example of the type of information that a Title Block may contain

How are Title Blocks used within Kahua?
In Kahua, a Drawing’s Title Block, along with the entire Drawing itself, can be viewed using Kahua’s native Viewer. Drawings uploaded to Kahua may be viewed on any device (desktop, web, or mobile) as long as the user has the necessary permissions.
In addition to the Title Block being used to provide a visual indication of specific information about the Drawing being viewed, Kahua can be configured to ‘extract’ the information from the Title Block.
The process of ‘extracting’ information from a Title Block is called ‘Title Block Extraction’. The extracted information can be used to auto-populate any number of drawing-related attributes (such as Sheet Number and Sheet Title), as well as help to generate standardized file naming for these Drawing files.
Sounds interesting. Where do I start?
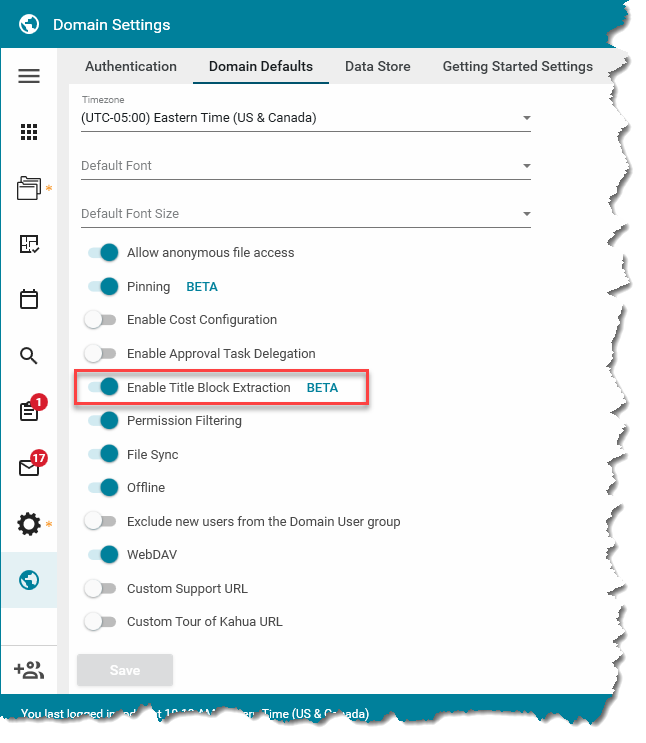
It’s important to note that for this version of this guide, the “Title Block Extraction” process is still a BETA feature. As such, the feature needs to be explicitly enabled by your Domain Administrator for your domain using the ‘Domain Settings’ app:
Image 3: Domain Configuration to enable the ‘Title Block Extraction’ feature
As a user of a BETA feature, we encourage you to share your feedback about this feature with Kahua. Also, we’re very happy to test your files before you attempt the extraction process, so that we can identify and fix any issues before you encounter them. Only with additional representative drawing sets can we ensure that we’ve optimized the “Title Block Extraction” feature for all potential scenarios.
Using Kahua’s Title Block Extraction process in Kahua is relatively easy, once you understand a few concepts and then do some initial configuration.
Concept #1: The first concept is that of a ‘Controlled’ folder. In Kahua, the File Manager app is where the project team can upload, manage, share, and view all project-related files. File Manager has many similarities to Windows File Explorer, in that a folder hierarchy can be set up, and then files can be uploaded to these various folders. While most files are best stored in a standard ‘Files’ folder, it’s generally recommended that Drawings be stored instead in a special ‘Controlled’ folder type. A ‘Controlled’ folder serves the purpose of a Drawing Log, except that you can have any number of ‘Controlled’ folders, each with its own purpose and set of permissions. A ‘Controlled’ folder has many of the attributes you’d expect in a Drawing Log, such as Sheet Number, Sheet Title, Discipline, etc. But the real power of the ‘Controlled’ folder is the many Drawing-related processes that it provides; one of which is Title Block Extraction.
Image 4: Example of a Controlled Folder

Concept #2: The second concept is that of a ‘Drawing Revision’. A single Drawing can, and usually does, have multiple revisions over the life of a project. For example, an “A101 – Architectural 1st Floor Plan Drawing” may be initially received as ‘Revision 0’, but over time, that same Drawing may be reissued multiple times as changes are incorporated, such that it may be ‘Revision 14’ by the end of the project. In some organizations it may be common to rev up all drawings in a set together (e.g., all drawings in a full set move from Rev 2 to Rev 3 in unison), while many other organizations only rev up the drawings that actually change (e.g., in a full drawing set, there may be one drawing with Rev 3 and another with Rev 7). Since the ‘Controlled’ folder is analogous to a Drawing Log, each record in the log represents a Revision. For example, that A101 Drawing with 14 Revisions will have 14 associated records, each with an associated Drawing file. The information is structured such that the information common to the Drawing itself (e.g., Sheet Number, Sheet Title, etc.) is in the ‘Document’ section, and the information that is specific to each Drawing Revision (e.g., Revision Number, Revision Date, etc.) is in the ‘Revision Details’ section.
Image 5: The structure of a Drawing Revision record (‘Document Header’ and ‘Revision Details’)

Concept #3: The third concept is that of a ‘Title Block Template’. The basic purpose of the template is defining the mapping of areas of the Title Block to specific Drawing attributes. Because each Drawing Set has the potential to have different Title Block arrangements, Kahua provides a way to create and manage multiple Title Block Templates. Different templates may be created for each contributing organization. For example, on a single a project there may be a need to have one template defined for the Architectural Drawing Sets (which come from the Architect), one for the Structural Drawing Sets (which come from the Structural Design Team), and one for the MEP Drawing Sets (which comes from the MEP Design Team).
Image 6: The information associated with a Drawing Revision (‘Document Header’ and ‘Revision Details’)
I understand the Concepts described. Now how do I perform a Title Block Extraction?
These are the 4 steps necessary to perform a Title Block Extraction:
- Create a ‘Title Block Template’ (this generally only needs to be done once per contributing organization)
- Upload your Drawing Sets to a Controlled Folder and Select the desired Title Block Template when prompted
- Review and validate the completed extraction process (making case-by-case corrections if necessary)
- Publish the Drawings (and optionally delete the working folder)
Each of these steps will now be described in detail.
STEP 1: Creating a ‘Title Block Template’
To create a ‘Title Block Template’, you must have the ability to Configure the File Manager application for your project. If you don’t have this permission, you either need someone to create the ‘Title Block Template’ on your behalf, or your Kahua Admin needs to grant you the necessary permission.
But before you actually being the process of creating a new ‘Title Block Template’, it’s important to first have some familiarity with your Drawing Set and do some initial (often 1-time) configuration:
- Is your drawing set a single multi-page PDF, or is it made up of individual files (one file per sheet)?
- If it’s a single multi-page PDF
- determine whether there are pages that aren’t actually part of the Drawing Set and don’t have any Title Blocks (e.g., a Cover Page, etc.) – these pages can be ignored during the extraction process
- extract 1 representative page as a new PDF to base the template on – this page can be extracted and saved using most 3rd party PDF viewers, such as Adobe Acrobat, Bluebeam, etc. – the drawing index sheet is usually a good candidate
- If it’s made up of individual files (one file per sheet)
- determine whether there are any files that aren’t actually part of the Drawing Set and don’t have any Title Blocks (e.g., a Cover Page, etc.) – these files should not be included as part of the upload
- select one of the files to base the template on – the drawing index is usually a good candidate, or any file that has a smaller file size than most of the others
- If it’s a single multi-page PDF
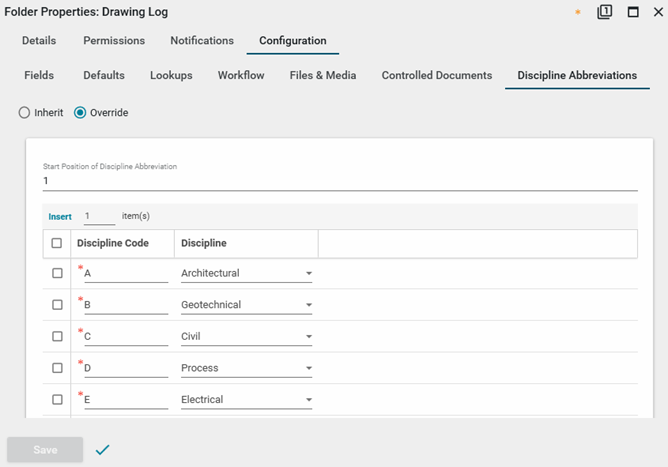
- Does your Title Block indicate the Discipline, or is the Discipline code embedded within the Sheet Number?
- If the Discipline is displayed on the Title Block, you’ll want to configure your folder’s Lookups to add ‘Discipline’ to your ‘Text Extraction Attributes’
- this can also be configured further up the folder hierarchy, or even at the File Manager app itself

- this can also be configured further up the folder hierarchy, or even at the File Manager app itself
- If the Discipline code is embedded within the Sheet Number, you’ll want to note the position and number of characters of this code (it’s usually just the 1st character, but it could be 1-2 characters and start anywhere in the Sheet Number, esp. if the Sheet Number includes an Area prefix).
- If the Discipline is displayed on the Title Block, you’ll want to configure your folder’s Lookups to add ‘Discipline’ to your ‘Text Extraction Attributes’
- Are all the associated Disciplines represented in the folder’s Discipline Lookup?
- you’ll want to configure your folder’s Lookups to ensure that all Disciplines referenced in your Drawing Set are included in your Discipline Lookup
- this can also be configured further up the folder hierarchy, or even at the File Manager app itself

- this can also be configured further up the folder hierarchy, or even at the File Manager app itself
- If the Discipline code is embedded within the Sheet Number, you want to ensure that any Discipline codes referenced in your Drawing Set are also configured in your folder’s ‘Discipline Abbreviations’
- this can also be configured further up the folder hierarchy, or even at the File Manager app itself
4. Make note of all the attributes that you want to map from your Title Block.
- you’ll want to configure your folder’s Lookups to add any fields not already listed for your ‘Text Extraction Attributes’. Note that you can add your own project-specific attributes as well.
- this can also be configured further up the folder hierarchy, or even at the File Manager app itself
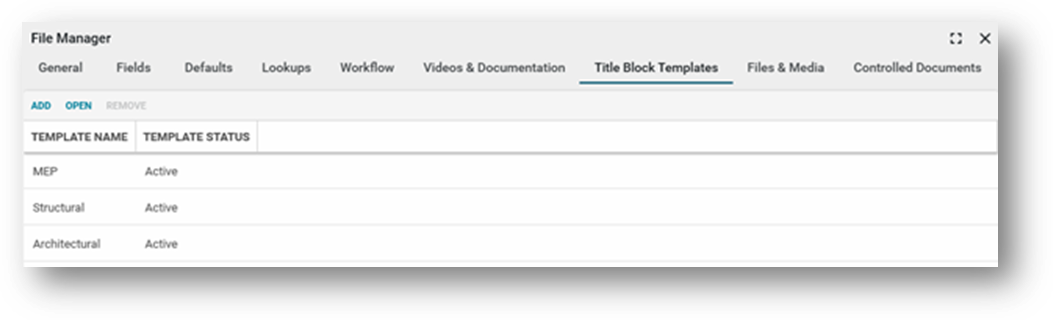
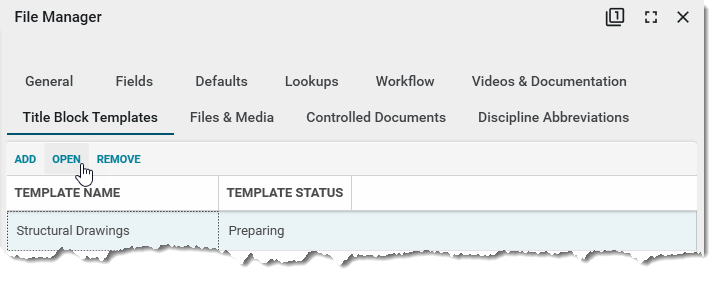
As mentioned earlier, creating a Title Block Template requires that you have permission to configure the File Manager app for your Project. Within the Configuration app, select the ‘Title Block Templates’ tab, and ‘Add’.

Enter a name for the Template (e.g. Structural Drawings), select a file for the template, then ‘Save’.
R TIP: The recommended best practice when selecting a file for creating a Title Block Template is to use a single-page PDF file that has a relatively small file size. Though multi-page PDFs may sometimes work, they should be avoided. |

After saving, you’ll be returned to configuration where you’ll see that your new template has a Template Status of “Preparing”. You may click on its corresponding row, and then select ‘OPEN’.
You will then be presented with a preview of your Template file. Navigate down to your Title Block region, then zoom in so that you can easily read the contents of the Title Block.

Click the ‘ADD’ button, then use the ‘Map’ tool to draw a box around the Sheet Number (labeled “Drawing No” in this example). After creating the mapped region, select the associated attribute (in this example, Drawing. SheetNumber was selected). Note that the mapped region may be moved/resized as necessary.
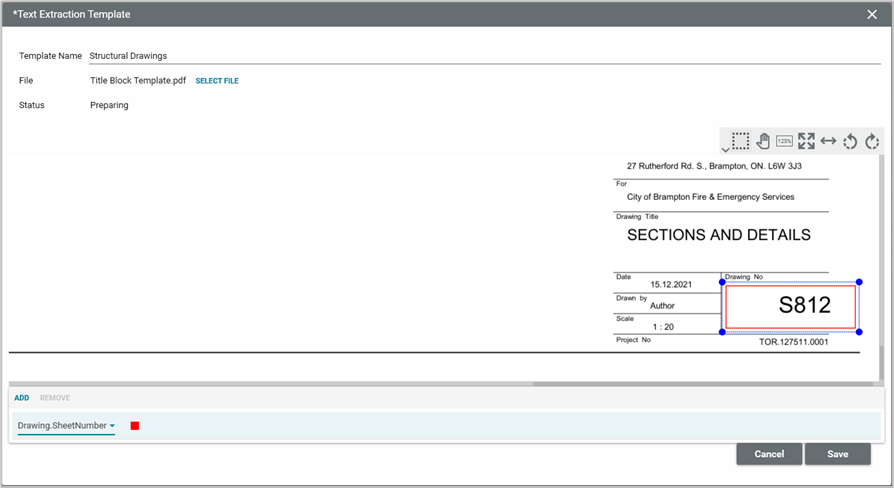
R TIP: The recommended best practice is to to make the mapped region as large as possible, but without going into any other areas. This will account for situations where data on one drawing fills more space than what’s on another drawing (esp. with variable length text, such as the Sheet Title). It also helps account for variations between drawing set, including minor margin changes or minor shifts in Title Block placement. |
Repeat the previous process, but this time for the Sheet Title (labeled “Drawing Title” in this example):
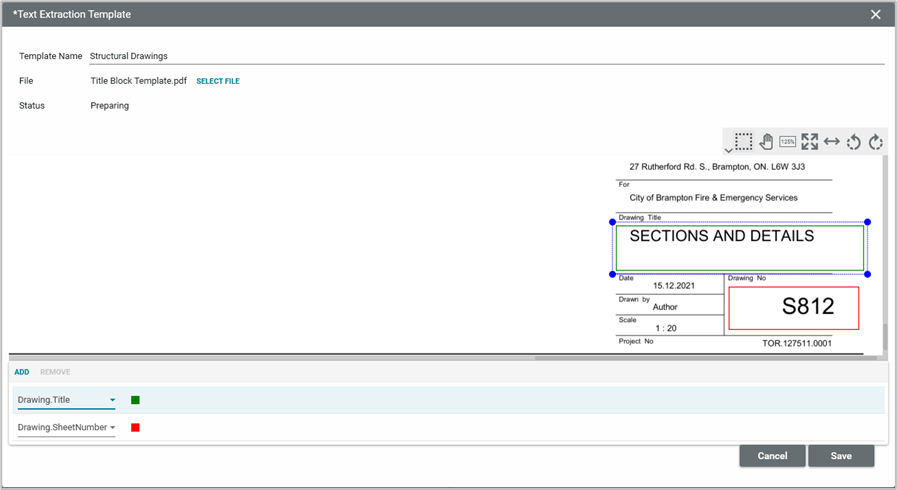
This mapping process should be repeated for as many attributes as you need to extract, up to a maximum of 10. Once you’re complete, you can ‘Save’ the template. You may re-open and modify the template as many times as is necessary. Template modification typically becomes necessary if:
- tweaks need to be made to the mapping region, because the intended data isn’t all captured, or because the region is too large and is pulling in extraneous information
- additional mapping regions need to be added, or others need to be removed
- the wrong attribute was mapped to a mapping region.
- The Title Blocks on subsequent drawing sets (new issuances of previously received documents) have moved slightly (this happens sometimes when sheet margins change), or the layout has changed (this is extremely uncommon)
NOTE: Date mappings are not yet supported. This guide will be updated when Dates are eventually supported.
NOTE: Extracting ‘Revision Number’ from a Revision Table is not currently supported. To extract the Revision Number, it must be explicitly defined within the Title Block (see example below).

STEP 2: Uploading your Drawing Set to a Controlled Folder and Selecting the desired Title Block Template
Before attempting to upload your entire Drawing Set and trying out the Title Block Extraction process, it’s a recommended best practice to first test the upload/extraction process with the same file that you used for your template. The benefit of this test is that it’ll be a quick way to determine whether your mappings are correct since this is only a single-sheet PDF (whereas your Drawing Set may consist of several hundred Drawing Sheets).
To initiate this test, upload the file (using either the ‘Add Files’ action or drag-and-drop). When presented with the dialog below, select “Title Block using Working Folder”.
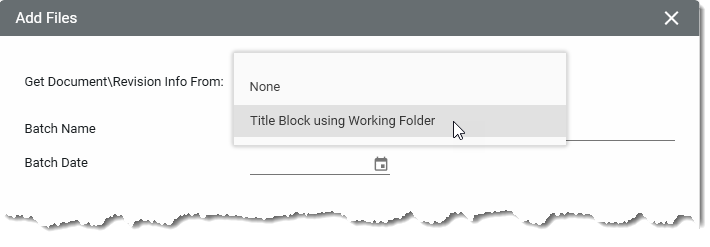
The dialog will then prompt you for the ‘Title Block Template’, where you’ll select the template you just created (“Structural Drawings”). The ‘Working Folder Name’ is the name of the temporary working folder that’s going to be created. The folder name defaults to today’s date, but it can be anything. For this exercise, we’ll leave the default, and select ‘Continue’.
NOTE: If you have more than one template defined, it’s important that you select the correct template in this step, otherwise the extraction process will not likely complete successfully.

In the example below, you’ll see that the Title Block Extraction process correctly extracted the Sheet Number (in red), the Sheet Title (in green), and the Discipline (by inference, using the 1st character of the Sheet Number).

Additionally, the File Name was generated using the folder’s configuration for Controlled Documents, which defines the File Name as: [Attribute(Drawing.SheetNumber)] Rev[Attribute(Revision)] -- [Attribute(Drawing.Title)].
The “File Name Nomenclature” option is completely optional (enabled using the ‘Enforce Nomenclature’ checkbox), but can be of significant benefit by promoting file name consistency. Drawings are auto-named according to the Title Block attributes extracted and the nomenclature definition that’s been configured. This is especially useful when splitting a large multi-page PDF, because it makes it very easy for anyone to tell what the file is without opening/viewing the Drawing.

Since the test was a success, if we now repeat the process with the full Drawing Set, there’s a greater chance that the extraction process will work here as well. When repeating the process with the full Drawing Set, we’ll see a slightly different set of dialogs, because we’re now uploading a multi-page PDF instead of a single-page PDF.
The first dialog that will be different is this one, that has some options about file splitting and start/end pages. Generally, you’ll want to always check the option to Split the file. In this example, that will generate 18 separate 1-page PDF files, each representing a single sheet. Also, because I know that all pages of this file include a Title Block (there isn’t a cover page, etc.), I’ll leave the default page start/end as indicated.

Because I’m splitting a PDF, this time the system assumes that I want to do a Title Block Extraction. But because I have multiple Title Block Templates, I still need to make sure that I select ‘right’ one (the one that corresponds to my Drawing Set). I also know that this is my ‘IFC Set’, so I’ve manually typed that in, and an associated date, as well.

STEP 3: Review and Validate the Completed Extraction Process
When the extraction process is complete, you’ll have the ability to review and validate the information in the working folder (in this example, it’s the child folder named “05-JUL-2023” that’s under the target folder).
Options include:
- Performing a multi-select edit to input many values in bulk
- Performing a multi-select edit to view the associated Title Block of each Drawing while viewing and having the ability to update individual attributes
- Individually entering/modifying any value that needs to be adjusted or was not mapped.
STEP 4: Publishing Drawings
After the entire Drawing Set has been reviewed and modified as necessary, they can be published back to the target folder. The following dialog results:

The Revision Number, the only required field, can be entered here if it wasn’t entered before the Publish process was initiated. Note that there are 3 options for entering the Revision Number in this dialog:
- Individually entering the Revision Number in the grid
- Setting the Revision Number to a specific value (making sure to first view what the ‘last Rev Number’ is)
- Auto Incrementing the Revision Number
Recommended Best Practices for the ‘Title Block Extraction’ Process
- When selecting a file for creating a Title Block Template, use a single-page PDF file that has a relatively small file size. Though multi-page PDFs may sometimes work, they should be avoided.
- When mapping regions in the Title Block Template, make the mapped region as large as possible, but without going into any other areas. This extra buffer will account for situations where data on one drawing fills more space than what’s on another drawing (esp. with variable length text, such as the Sheet Title). It also helps account for variations between drawing sets, including minor margin changes or minor shifts in Title Block placement.
- Test the Title Block Template with the same file used in the template itself. This is a very quick way to validate the mapping before you take the time to process your entire Drawing Set.
- If possible, request that the authoring organization provide a Sheets in the Drawing Set with the same dimensions (sheet size) and same internal rotation. This will make the extraction process more efficient.
- If there’s a desire to extract the Revision Number, ensure that the value is displayed explicitly in the Title Block. Extracting the Revision Number from a Revision Table is not currently supported.
Kahua’s Title Block Extraction process compared to the Competition
Kahua | the competition |
can extract any data, including client-specific attributes | limited to just Sheet Number, Sheet Title and Discipline |
Supports mapping up to 10 attributes | supports only 3 attributes |
Unlimited number of Title Block Templates can be defined | limited to a single ‘template’ |
Drawings can be any format, including native CAD | drawings must be PDF format |
Drawings can be in any orientation | drawings must be in Landscape orientation |
PDFs can be vector or raster (scanned) | PDFs should contain all vector format |
TrueType font is recommended, but not required | TrueType font is required |
Title Block can exist anywhere on the Drawing Set | drawing number needs to be located near the bottom right corner with the title nearby |
Labels are optional | labels are required for drawing title and drawing number (e.g. 'Sheet Title:' and 'Sheet Number:') |
Any size text is supported | drawing number and title should be larger than other text in the title block |
Title may be any number of lines of text | recommends that title is only a single line of text |
Any Z coordinate value is supported | the Z coordinate value of the text must be zero |
Configurable auto-generation of file names | no configurable file naming |
Auto-generation of all hyperlinks (callouts, index, etc.) | limited hyperlink generation |